
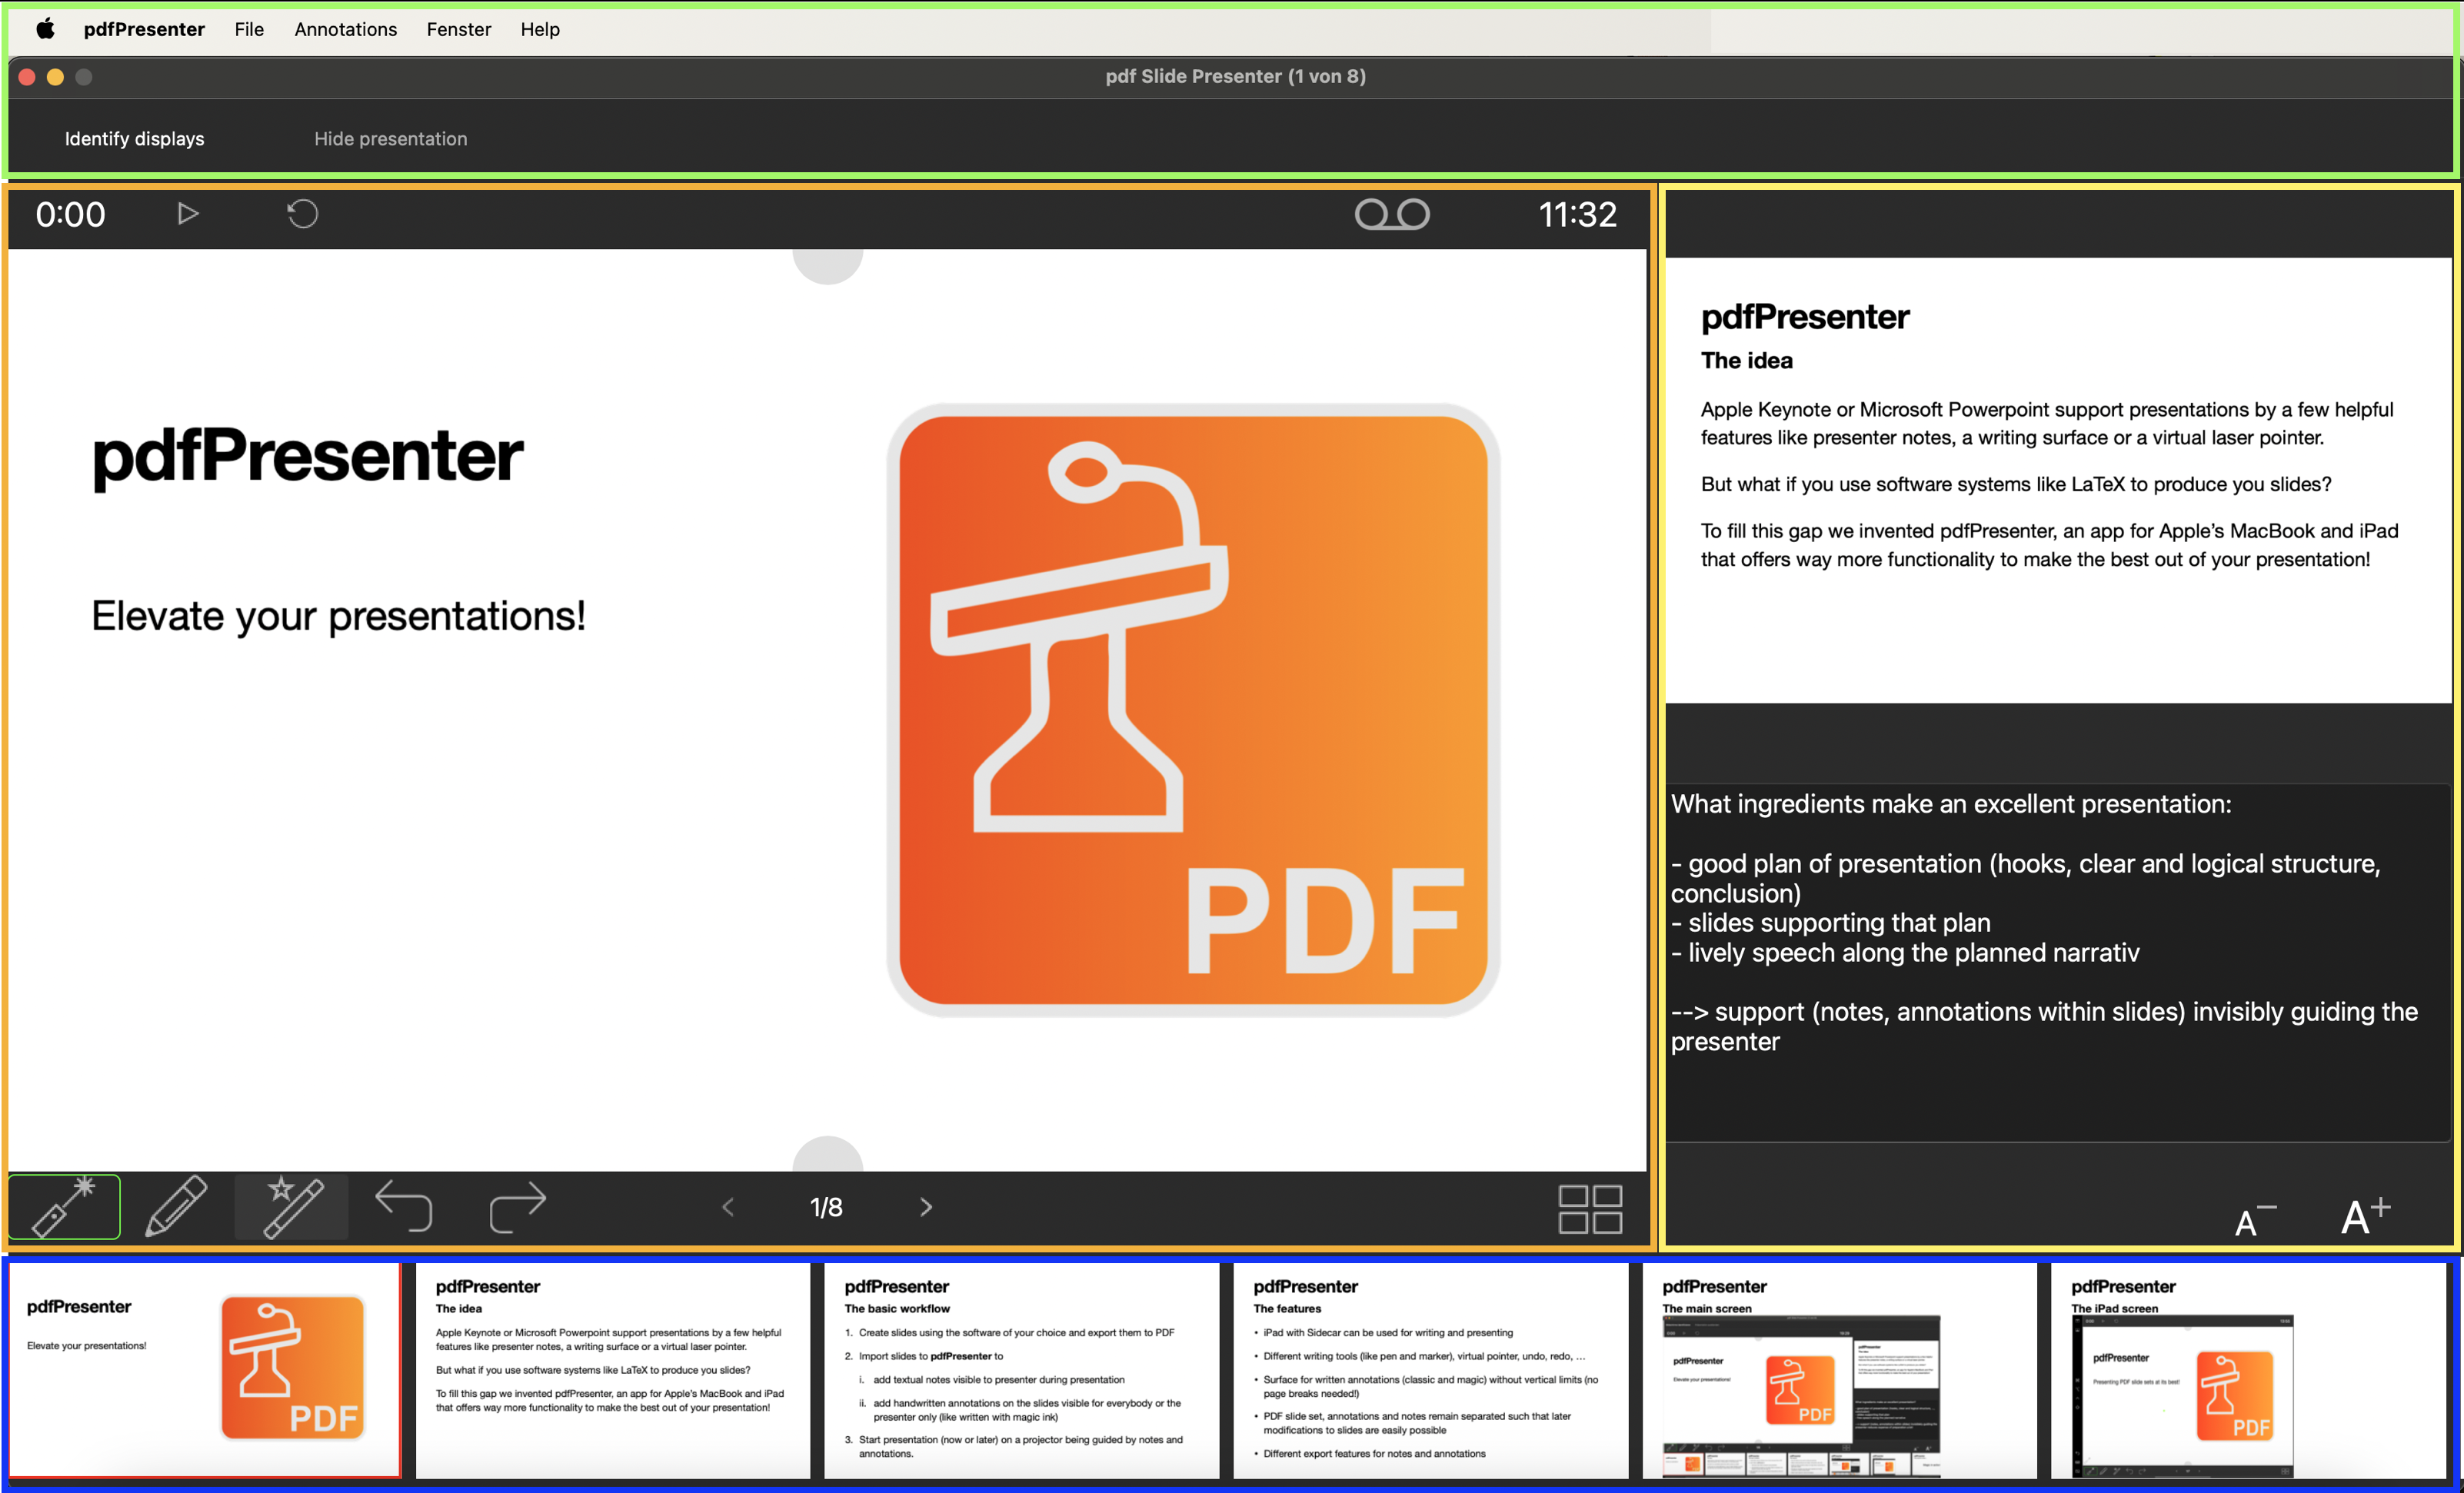
Main Window
The main window of pdfPresenter is divided into four areas:
- The menu area (top, outlined in green in the image);
- the work area (left, outlined in orange in the image);
- the slide preview and notes (on the right, outlined in yellow in the image);
- the presentation timeline (bottom, outlined in blue in the image).
Menu area
The menu area contains some of the usual menu items for each app and some special items for pdfPresenter. It also contains a menu band with the buttons Identify displays and Show presentation or Hide presentation. The following functions are hidden behind the menu items:
-
- Apple menu: When using pdfPresenter, access to the system settings is particularly helpful here, which can be used to establish a connection between Mac and iPad (see Configuring Sidecar).
- pdfPresenter: The app’s own sub-items here are About pdfPresenter, Settings …, Language and Buy pdfPresenter. The latter opens a window for managing the licenses and feature extensions purchased via the App Store. Within the settings the pointer’s color can be modified. Furthermore, a variable line width can be activated that adapts to the dynamics of writing. You can specify the background color of slides, key-codes used by a presenter to switch slides and configure the parameters needed for streaming (rtmp) a presentation (server-URL, username and password), too. See Streaming for details.
- File: This menu item allows you to close the opened file and to save the created or modified notes and annotations. Annotations and notes are always linked to the PDF file that is currently open (identified by file name as shown in the Slide Decks window). If they are saved and the same slide deck (PDF file) is opened later, they are also read in.
- Annotations:
To manage the annotations associated with the open slide set (notes, handwritten additions on the magic writing surface), you can export notes and/or handwriting to a PDF file here, you can reorganize the annotations (more on this under annotations and notes) and manage annotations, i.e. import and export them or reset them to the previous version. Importing and exporting is used on the one hand to exchange annotations between computers, and on the other hand to archive or restore them.
The menu band contains the buttons
- Identify displays: This function is available as soon as a slide set is opened. Clicking on it checks whether an iPad is connected to the computer via Sidecar and, if so, opens the iPad screen there. If a projector is connected (and is shown as an available display in the system settings), the presentation view is opened there. In this case, the Hide presentation button is also activated.
Important: Make sure that the iPad is shown as a display via Sidecar in the system settings and that the Extended display option is selected under Use as. - Hide presentation / Show presentation: If the current slide is displayed on a projector, it can be hidden in this way; if it is hidden, it can be displayed again in this way.
Workspace
In this area you can see the slide currently visible in the presentation view (projector). You can see the handwritten annotations of both the magic and presentation writing surfaces. Above the slide is a band with
- a display of the elapsed presentation time (0:00 in the picture above),
- a button to start or pause it,
- a button to reset it, and
- a button (camera symbol) to start streaming and/or recording (needs a presentation on display to be enabled)
- and the current time on the right-hand side (11:32 in the picture).
Note: If you have started the stopwatch for the presentation time, all annotations on the magic writing surface will be displayed in a less bright color. This way you never lose track of which of the annotations are only visible to you and which are visible to everyone.
Below the slide there is a ribbon with
- a button to select the pointer as the current tool (use pointer tool to open a hyperlink, too),
- a button for selecting the writing tools for the presentation writing surface, and
- a button for selecting magic pens.
The latter two open a panel in which you can select the type of writing tool (pen, highlighter, eraser) and the color used. It is also possible to completely clear the corresponding writing surface. Which of the three options is currently active is indicated by a green border around the corresponding button (the pointer in the picture). The mouse pointer indicates which writing tool is in use.
Note: When using a writing tool (magic or presentation writing surface), the content of the other writing surface is displayed less intensively. This makes it easy to distinguish between the two and to add or change the associated content.
The other buttons or displays on the band are (from left to right)
- an Undo button, which cancels the last action of a writing tool,
- a Redo button, which reverses the previous action,
- a < button for switching to the previous slide,
- a display of the current slide number; if this is double-clicked, you can jump directly to the corresponding slide by entering a valid number,
- a > button to switch to the next slide,
- to the right (in case the large writing area is activated) up and down arrows for scrolling, and
- a button on the far right to open the overview of all slides.
Note: If a Logitech Spotlight Presenter or a compatible device is connected to the Macintosh and its Spotlight software is inactive, you can use the buttons on the remote control to control the slide change and the pointer of the pdfPresenter. In the settings… menu you can active user defined key codes for changing between slides if needed with your presenter.
If the corresponding feature large writing area is activated, a semicircle is visible at the top and bottom center of the slide, which serve as a handle for scrolling the writing surface. This function means that any amount of space is available below each slide on a borderless (no page breaks) writing surface both for magic ink and as the presentation writing surface.
Slide preview and notes
This area is particularly useful for support during the presentation. It shows the next slide (if available) and the notes for the current slide below it. In the image above, the notes area has the focus (recognizable by the blue line at the bottom) so that text entries can be made. The font size of the notes can be adjusted using the A+ or A- buttons.
Presentation timeline
This area at the bottom of the main window shows a section of the open slide set. Slides further to the left have a smaller page number, slides further to the right have a larger page number. The view of the current slide is outlined in red. You can vary the visible section by swiping, clicking on a slide opens it in the workspace.